Last post of August!?! I know it’s cliche and I say it all the time, but I can’t believe how fast the month went by. I mean, I’m 100% ready for Fall, pumpkin, and cozy clothes but I can’t believe that it’s almost September. I love looking forward to things and when they finally arrive, I get a bit sad because they will be over soon. I love Fall so much, I just want to live in perpetual Fall somewhere they are always serving pumpkin bread.
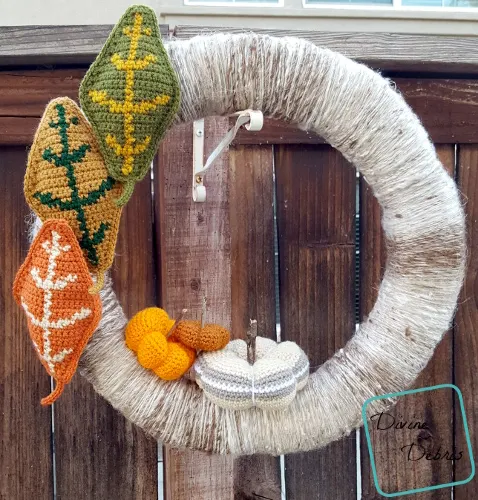
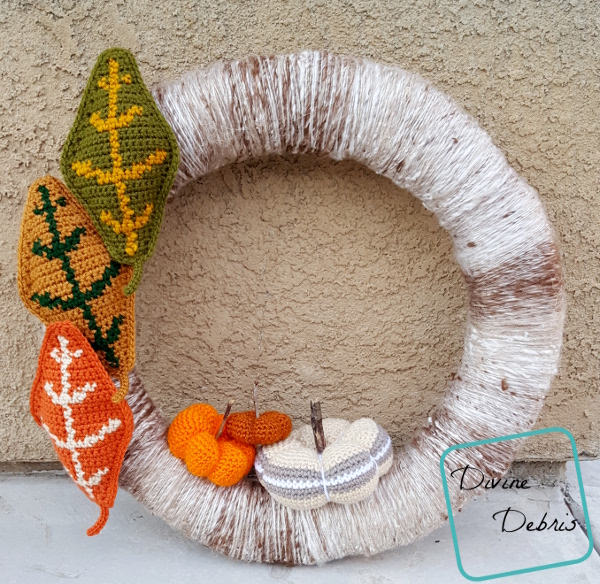
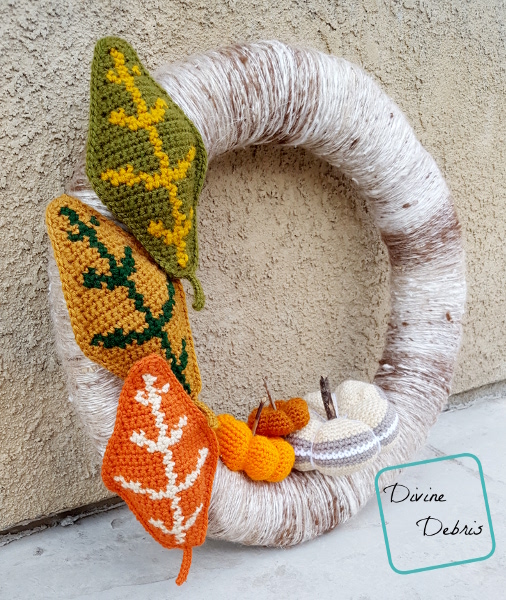
This week’s design has been on my door for a while and I love seeing it as I walk up. it’s just a simple design (much more than my Halloween wreath) but it’s a good intro Fall design, to kinda dip your toe in the Fall season without going full PUMPKINS ARE THE BEST. You know? Not that last week’s Big Ol’ Pumpkin design didn’t scream “PUMPKINS ARE THE BEST” but that’s just sitting on my table in the living room. I honestly can’t wait to see what spin people put on this door wreath. I like groups of 3 (you can see that in the 3 candy corns in the Halloween wreath) and so I did 3 and 3 with the leaves and pumpkins, but I think you could go all pumpkins or all leaves and it will look awesome either way. I hope you add photos to Ravelry or share photos on Instagram with the tag #DivineDebris
I hope you’re well, out there. Taking care of yourself, getting enough to eat and water. You’re valuable, you matter. <3 <3
If you appreciate my weekly patterns I hope you’d consider purchasing an ad-free pdf of this pattern in my Ravelry shop.


A huge thank you all my patrons on Patreon!
Thank you to all my Patreon supporters.


Materials
- US G (4.00 mm) crochet hook
- Aran/ medium/ size #4 weight yarn
- 1.5 – 2 oz | 50 – 100 yds per leaf/ pumpkin
- 1 – 2 colors
- 1 – 2 oz | 50 – 100 yds each
- Yarn needle
- Fiber fill/ Poly fill (stuffing)
- 18″ wreath form
- Hot glue or straight pins


Terms/stitches used
- Ch: chain
- St: stitch
- Slip st: slip stitch
- Sc: single crochet
- Sc2tog: single crochet 2 sts together
Notes
- The Leaf is worked row by row, with a turn at the end/ beginning of the row. Make the Back first and the Front second, so that you can sc around the two pieces, securing them together.
- The instructions on the leaf that read (sc2tog + a number) or (a number + sc2tog) mean that you sc2tog the first or last two sts of the row and work scs in the number of stitches indicated.
- Every stitch in the leaf is a single crochet. The directions will only tell you what color (ie: Color A, Color B, etc…) and the number in the parentheses tells you how many scs to make.
- In the leaf, the inactive yarn is carried behind the active. If this is confusing, you might want to check out the helpful Moogly video on tapestry.
- The ch 1 does not count as a stitch.
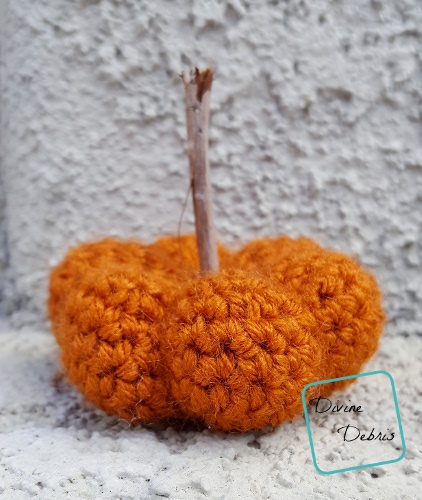
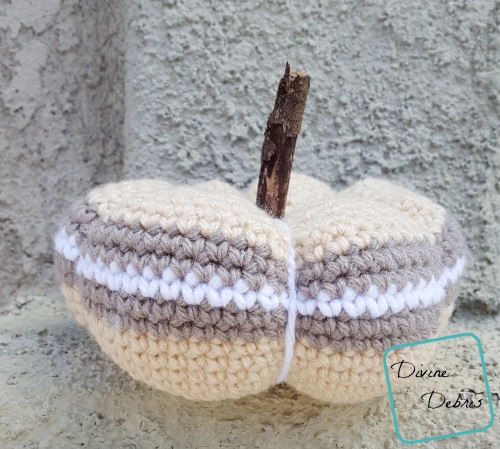
- The pumpkins are worked from the bottom up, in the round, with a slip st into the first st.
- To create the sections on the pumpkin, you will pull yarn through the center of the pumpkin while wrapping it around the outside and pulling it tight.
- The stems of the pumpkin were created by using sticks. You can use any material that suits your needs.
- The wreath body was wrapped using a miscellaneous yarn to give it more personality.
Finished product dimensions
(approx)
| Leaf Length: 7″Width: 4.25″ | Small Pumpkin Height: 1″Width: | Medium Pumpkin Height: 2″Width: 3.5″ | Large Pumpkin Height: 2.5″Width: 5″ |

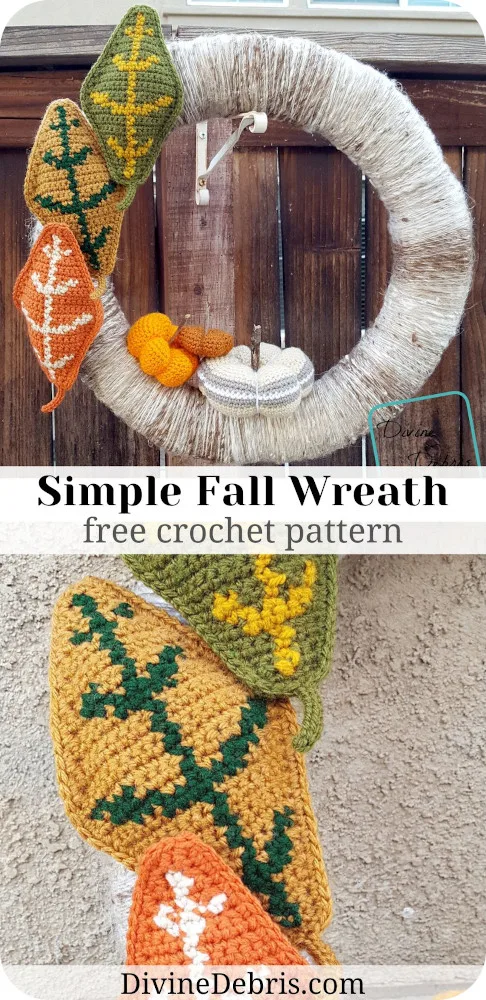
Simple Fall Wreath Crochet Pattern Instructions
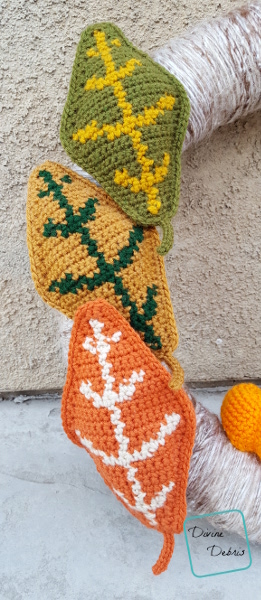
– Leaf –
Back
Row 1: A: Ch 6, sc into the second ch from the hook and into the next 4 sts – 5 sc
Row 2: A: Ch 1, sc into the next 5 sts – 5 sc
Row 3: A: Ch 1, turn, sc twice into the first st, sc into the next 3 sts, sc twice into the last st – 7 sc
Row 4: A: Ch 1, turn, sc into the next 7 sts – 7 sc
Row 5: A: Ch 1, turn, sc twice into the first st, sc into the next 5 sts, sc twice into the last st – 9 sc
Row 6: A: Ch 1, turn, sc into the next 9 sts – 9 sc
Row 7: A: Ch 1, turn, sc twice into the first st, sc into the next 7 sts, sc twice into the last st – 11 sc
Row 8: A: Ch 1, turn, sc into the next 11 sts – 11 sc
Row 9: A: Ch 1, turn, sc twice into the first st, sc into the next 9 sts, sc twice into the last st – 13 sc
Row 10: A: Ch 1, turn, sc into the next 13 sts – 13 sc
Row 11: A: Ch 1, turn, sc twice into the first st, sc into the next 11 sts, sc twice into the last st – 15 sc
Row 12: A: Ch 1, turn, sc into the next 15 sts – 15 sc
Row 13: A: Ch 1, turn, sc twice into the first st, sc into the next 13 sts, sc twice into the last st – 17 sc
Row 14: A: Ch 1, turn, sc into the next 17 sts – 17 sc
Row 15: A: Ch 1, turn, sc twice into the first st, sc into the next 15 sts, sc twice into the last st – 19 sc
Rows 16 – 18: A: Ch 1, turn, sc into the next 19 sts – 19 sc
Row 19: A: Ch 1, turn, sc2tog the first 2 sts, sc into the next 15 sts, sc2tog the last 2 sts – 17 sc
Row 20: A: Ch 1, turn, sc into the next 17 sts – 17 sc
Row 21: A: Ch 1, turn, sc2tog the first 2 sts, sc into the next 13 sts, sc2tog the last 2 sts – 15 sc
Row 22: A: Ch 1, turn, sc into the next 15 sts – 15 sc
Row 23: A: Ch 1, turn, sc2tog the first 2 sts, sc into the next 11 sts, sc2tog the last 2 sts – 13 sc
Row 24: A: Ch 1, turn, sc into the next 13 sts – 13 sc
Row 25: A: Ch 1, turn, sc2tog the first 2 sts, sc into the next 9 sts, sc2tog the last 2 sts – 11 sc
Row 26: A: Ch 1, turn, sc into the next 11 sts – 11 sc
Row 27: A: Ch 1, turn, sc2tog the first 2 sts, sc into the next 7 sts, sc2tog the last 2 sts – 9 sc
Row 28: A: Ch 1, turn, sc into the next 9 sts – 9 sc
Row 29: A: Ch 1, turn, sc2tog the first 2 sts, sc into the next 5 sts, sc2tog the last 2 sts – 7 sc
Row 30: A: Ch 1, turn, sc into the next 7 sc – 7 sc
Row 31: A: Ch 1, turn, sc2tog the first 2 sts, sc into the next 3 sts, sc2tog the last 2 sts – 5 sc
Row 32: A: Ch 1, turn, sc into the next 5 sts – 5 sc
Row 33: A: Ch 1, turn, sc2tog the first 2 sts, sc into the next 1 st, sc2tog the last 2 sts – 3 sc
Row 34: A: Ch 1, turn, sc into the next 5 sts – 3 sc
Fasten off, weave in your ends.
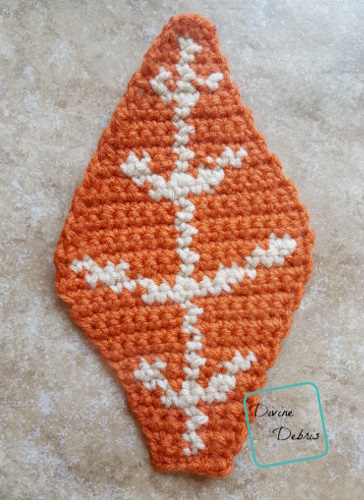
Front
Row 1: A: Ch 6, sc into the second ch from the hook and into the next 4 sts – 5 sc
(RS) Row 2: A: Ch 1, turn, (2), B: (1), A: (2) – 5 sc
Row 3: A: Ch 1, turn, (2x + 1), B: (1), A: (1 + 2x) – 7 sc
Row 4: A: Ch 1, turn, (3), B: (1), A: (3) – 7 sc
Row 5: A: Ch 1, turn, (2x + 2), B: (1), A: (2 + 2x) – 9 sc
Row 6: A: Ch 1, turn, (2), B: (5), A: (2) – 9 sc
Row 7: A: Ch 1, turn, (2x), B: (2), A: (1), B: (1), A: (1), B: (2), A: (2x) – 11 sc
Row 8: A: Ch 1, turn, (1), B: (2), A: (2), B: (1), A: (2), B: (2), A: (1) – 11 sc
Row 9: A: Ch 1, turn, (2x + 4), B: (1), A: (4 + 2x) – 13 sc
Row 10: A: Ch 1, turn, (6), B: (1), A: (6) – 13 sc
Row 11: A: Ch 1, turn, (2x + 5), B: (1), A: (5 + 2x) – 15 sc
Row 12: A: Ch 1, turn, (7), B: (1), A: (7) – 15 sc
Row 13: A: Ch 1, turn, (2x + 6), B: (1), (6 + 2x) – 17 sc
Row 14: A: Ch 1, turn, (5), B: (7), A: (5) – 17 sc
Row 15: A: Ch 1, turn, (2x + 2), B: (3), A: (2), B: (1), A: (2), B: (3), A: (2 + 2x) – 19 sc
Row 16: A: Ch 1, turn, (2), B: (3), A: (4), B: (1), A: (4), B: (3), A: (2) – 19 sc
Row 17: A: Ch 1, turn, (1), B: (2), A: (6), B: (1), A: (6), B: (2), A: (1) – 19 sc
Row 18: A: Ch 1, turn, (9), B: (1), A: (9) – 19 sc
Row 19: A: Ch 1, turn, (sc2tog + 7), B: (1), A: (7 + sc2tog) – 17 sc
Row 20: A: Ch 1, turn, (8), B: (1), A: (8) – 17 sc
Row 21: A: Ch 1, turn, (sc2tog + 6), B: (1), A: (6 + sc2tog) – 15 sc
Row 22: A: Ch 1, turn, (5), B: (5), A: (5) – 15 sc
Row 23: A: Ch 1, turn, (sc2tog + 2), B: (2), A: (1), B: (1), A: (1), B: (2), A: (2 + sc2tog) – 13 sc
Row 24: A: Ch 1, turn, (2), B: (2), A: (2), B: (1), A: (2), B: (2), A: (2) – 13 sc
Row 25: A: Ch 1, turn, (sc2tog + 4), B: (1), B: (4 + sc2tog) – 11 sc
Row 26: A: Ch 1, turn, (5), B: (1), A: (5) – 11 sc
Row 27: A: Ch 1, turn, (sc2tog + 3), B: (1), A: (3 + sc2tog) – 9 sc
Row 28: A: Ch 1, turn, (4), B: (1), A: (4) – 9 sc
Row 29: A: Ch 1, turn, (sc2tog + 1), B: (3), A: (1 + sc2tog) – 7 sc
Row 30: A: Ch 1, turn, (1), B: (1), A: (1), B: (1), A: (1), B: (1), A: (1) – 7 sc
Row 31: A: Ch 1, turn, (sc2tog + 1), B: (1), (1 + sc2tog) – 5 sc
Row 32: A: Ch 1, turn, (2), B: (1), A: (2) – 5 sc
Row 33: A: Ch 1, turn, (sc2tog), B: (1), A: (sc2tog) – 3 sc
Fasten off color B.
Row 34: A: Ch 1, turn, (3) – 3 sc
Do not fasten off A, weave in your ends (other than your active yarn). Move onto closing.

Closing
Rnd 1: Ch 1, turn, from where you stopped on row 34 of the Front, sc into the next 3 sts, rotate the whole piece, sc down the next 34 row ends, rotate the the whole piece, sc into the next 3 sts, ch 10, slip st into the second ch from the hook and into the next 8 chs (this is the stem), sc into the next 2 sts, rotate the whole piece, sc into the next 34 row ends, slip st into the first st – 76 sc
Fasten off, weave in your ends.
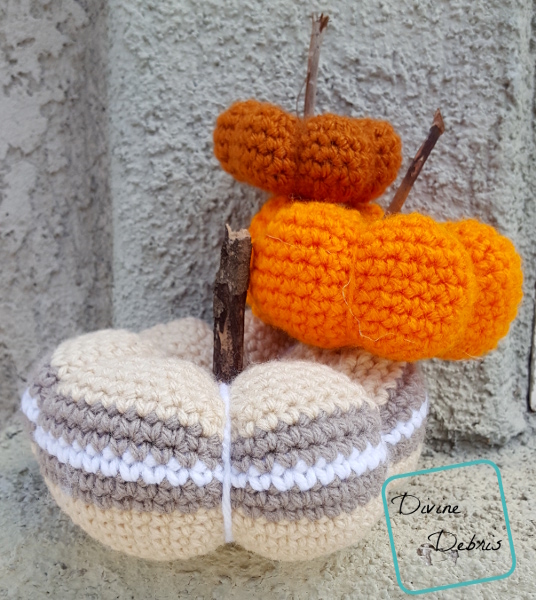
– Pumpkins –
If you’d like to make larger pumpkins, check out the Fun Fall Pumpkins
Small
Rnd 1: Create a magic circle, ch 1, sc into the circle 6 times, slip st into the first st – 6 sc
Rnd 2: Ch 1, sc twice into the same st as join and sc twice into the next 5 sts, slip st into the first st – 12 sc
Rnd 3: Ch 1, sc into the same st as join, sc twice into the next st, *sc into the next st, sc twice into the next st,* repeat from * to * 4 more times, slip st into the first st – 18 sc
Note: weave in your first end sooner rather than later.
Rnd 4: Ch 1, sc twice into the same st as join, sc into the next 2 sts, *sc twice into the next st, sc into the next 2 sts,* repeat from * to * 4 more times, slip st into the first st – 24 sc
Rnd 5: Ch 1, sc into the same st as join and into the next 2 sts, sc twice into the next st, *sc into the next 3 sts, sc twice into the next st,* repeat from * to * 4 more times, slip st into the first st – 30 sc
Rnd 6: Ch 1, sc twice into the same st as join, sc into the next 4 sts, *sc twice into the next st, sc into the next 4 sts,* repeat from * to * 4 more times, slip st into the first st – 36 sc
Rnds 7 – 9: Ch 1, sc into the same st as join and into the next 35 sts, slip st into the first st – 36 sc
Rnd 10: Ch 1, sc2tog the first 2 sts, sc into the next 4 sts, *sc2tog the next 2 sts, sc into the next 4 sts,* repeat from * to * 4 more times, slip st into the first st – 30 sc
Rnd 11: Ch 1, sc into the same st as join and into the next 2 sts, sc2tog the next 2 sts, *sc into the next 3 sts, sc2tog the next 2 sts,* repeat from * to * 4 more times, slip st into the first st – 24 sc
Rnd 12: Ch 1, sc2tog the first 2 sts, sc into the next 2 sts, *sc2tog the next 2 sts, sc into the next 2 sts,* repeat from * to * 4 more times, slip st into the first st – 18 sc
Note: Make sure to fill your pumpkin before the opening gets too small.
Rnd 13: Ch 1, sc into the same st as join, sc2tog the next 2 sts, *sc into the next st, sc2tog the next 2 sts* repeat from * to * 4 more times, slip st into the first st – 12 sc
Rnd 14: Ch 1, sc2tog the first 2 sts, *sc2tog the next 2 sts,* repeat from * to * 4 more times, slip st into the first st – 6 sc
Fasten off, weave in your ends.
Fasten off leaving a LONG (around 10″) tail and use that to close the hole on the top and then go through the center of said hole and direct the needle out the bottom (in the middle of the magic circle). Go around the outside of the pumpkin (pull this tight) and go back down through the center of the top, navigating the needle through the middle of the pumpkin and out the bottom. I did this 5 times, you can do this as many times as you want to get the puffy pumpkin sections. Weave in your end and glue a stick to the top for your stem.

Medium
Rnd 1: Create a magic circle, ch 1, sc into the circle 6 times, slip st into the first st – 6 sc
Rnd 2: Ch 1, sc twice into the same st as join and sc twice into the next 5 sts, slip st into the first st – 12 sc
Rnd 3: Ch 1, sc into the same st as join, sc twice into the next st, *sc into the next st, sc twice into the next st,* repeat from * to * 4 more times, slip st into the first st – 18 sc
Note: weave in your first end sooner rather than later.
Rnd 4: Ch 1, sc twice into the same st as join, sc into the next 2 sts, *sc twice into the next st, sc into the next 2 sts,* repeat from * to * 4 more times, slip st into the first st – 24 sc
Rnd 5: Ch 1, sc into the same st as join and into the next 2 sts, sc twice into the next st, *sc into the next 3 sts, sc twice into the next st,* repeat from * to * 4 more times, slip st into the first st – 30 sc
Rnd 6: Ch 1, sc twice into the same st as join, sc into the next 4 sts, *sc twice into the next st, sc into the next 4 sts,* repeat from * to * 4 more times, slip st into the first st – 36 sc
Rnd 7: Ch 1, sc into the same st as join and into the next 4 sts, sc twice into the next st, *sc into the next 5 sts, sc twice into the next st,* repeat from * to * 4 more times, slip st into the first st – 42 sc
Rnd 8: Ch 1, sc twice into the same st as join, sc into the next 6 sts, *sc twice into the next st, sc into the next 6 sts,* repeat from * to * 4 more times, slip st into the first st – 48 sc
Rnds 9 – 15: Ch 1, sc into the same st as join and into the next 47 sts, slip st into the first st – 48 sc
Rnd 16: Ch 1, sc2tog the first 2 sts, sc into the next 6 sts, *sc2tog the next 2 sts, sc into the next 6 sts,* repeat from * to * 4 more times, slip st into the first st – 42 sc
Rnd 17: Ch 1, sc into the same st as join and into the next 4 sts, sc2tog the next 2 sts, *sc into the next 5 sts, sc2tog the next 2 sts,* repeat from * to * 4 more times, slip st into the first st – 36 sc
Rnd 18: Ch 1, sc2tog the first 2 sts, sc into the next 4 sts, *sc2tog the next 2 sts, sc into the next 4 sts,* repeat from * to * 4 more times, slip st into the first st – 30 sc
Rnd 19: Ch 1, sc into the same st as join and into the next 2 sts, sc2tog the next 2 sts, *sc into the next 3 sts, sc2tog the next 2 sts,* repeat from * to * 4 more times, slip st into the first st – 24 sc
Rnd 20: Ch 1, sc2tog the first 2 sts, sc into the next 2 sts, *sc2tog the next 2 sts, sc into the next 2 sts,* repeat from * to * 4 more times, slip st into the first st – 18 sc
Note: Make sure to fill your pumpkin before the opening gets too small.
Rnd 21: Ch 1, sc into the same st as join, sc2tog the next 2 sts, *sc into the next st, sc2tog the next 2 sts* repeat from * to * 4 more times, slip st into the first st – 12 sc
Rnd 22: Ch 1, sc2tog the first 2 sts, *sc2tog the next 2 sts,* repeat from * to * 4 more times, slip st into the first st – 6 sc
Fasten off leaving a LONG (around 12″ – 15″) tail and use that to close the hole on the top and then go through the center of said hole and direct the needle out the bottom (in the middle of the magic circle). Go around the outside of the pumpkin (pull this tight) and go back down through the center of the top, navigating the needle through the middle of the pumpkin and out the bottom. I did this 5 times, you can do this as many times as you want to get the puffy pumpkin sections. Weave in your end and glue a stick to the top for your stem.
Large
Rnd 1: Create a magic circle, ch 1, sc into the circle 6 times, slip st into the first st – 6 sc
Rnd 2: Ch 1, sc twice into the same st as join and sc twice into the next 5 sts, slip st into the first st – 12 sc
Rnd 3: Ch 1, sc into the same st as join, sc twice into the next st, *sc into the next st, sc twice into the next st,* repeat from * to * 4 more times, slip st into the first st – 18 sc
Note: weave in your first end sooner rather than later.
Rnd 4: Ch 1, sc twice into the same st as join, sc into the next 2 sts, *sc twice into the next st, sc into the next 2 sts,* repeat from * to * 4 more times, slip st into the first st – 24 sc
Rnd 5: Ch 1, sc into the same st as join and into the next 2 sts, sc twice into the next st, *sc into the next 3 sts, sc twice into the next st,* repeat from * to * 4 more times, slip st into the first st – 30 sc
Rnd 6: Ch 1, sc twice into the same st as join, sc into the next 4 sts, *sc twice into the next st, sc into the next 4 sts,* repeat from * to * 4 more times, slip st into the first st – 36 sc
Rnd 7: Ch 1, sc into the same st as join and into the next 4 sts, sc twice into the next st, *sc into the next 5 sts, sc twice into the next st,* repeat from * to * 4 more times, slip st into the first st – 42 sc
Rnd 8: Ch 1, sc twice into the same st as join, sc into the next 6 sts, *sc twice into the next st, sc into the next 6 sts,* repeat from * to * 4 more times, slip st into the first st – 48 sc
Rnd 9: Ch 1, sc into the same st as join and into the next 6 sts, sc twice into the next st, *sc into the next 7 sts, sc twice into the next st,* repeat from * to * 4 more times, slip st into the first st – 54 sc
Rnd 10: Ch 1, sc twice into the same st as join, sc into the next 8 sts, *sc twice into the next st, sc into the next 8 sts,* repeat from * to * 4 more times, slip st into the first st – 60 sc
Rnds 11 – 20: Ch 1, sc into the same st as join and into the next 59 sts, slip st into the first st – 60 sc
Rnd 21: Ch 1, sc2tog the first 2 sts, sc into the next 8 sts, *sc2tog the next 2 sts, sc into the next 8 sts,* repeat from * to * 4 more times, slip st into the first st – 54 sc
Rnd 22: Ch 1, sc into the same st as join and into the next 6 sts, sc2tog the next 2 sts *sc into the next 7 sts, sc2tog the next 2 sts,* repeat from * to * 4 more times, slip st into the first st – 48 sc
Rnd 23: Ch 1, sc2tog the first 2 sts, sc into the next 6 sts, *sc2tog the next 2 sts, sc into the next 6 sts,* repeat from * to * 4 more times, slip st into the first st – 42 sc
Rnd 24: Ch 1, sc into the same st as join and into the next 4 sts, sc2tog the next 2 sts, *sc into the next 5 sts, sc2tog the next 2 sts,* repeat from * to * 4 more times, slip st into the first st – 36 sc
Rnd 25: Ch 1, sc2tog the first 2 sts, sc into the next 4 sts, *sc2tog the next 2 sts, sc into the next 4 sts,* repeat from * to * 4 more times, slip st into the first st – 30 sc
Rnd 26: Ch 1, sc into the same st as join and into the next 2 sts, sc2tog the next 2 sts, *sc into the next 3 sts, sc2tog the next 2 sts,* repeat from * to * 4 more times, slip st into the first st – 24 sc
Rnd 27: Ch 1, sc2tog the first 2 sts, sc into the next 2 sts, *sc2tog the next 2 sts, sc into the next 2 sts,* repeat from * to * 4 more times, slip st into the first st – 18 sc
Note: Make sure to fill your pumpkin before the opening gets too small.
Rnd 28: Ch 1, sc into the same st as join, sc2tog the next 2 sts, *sc into the next st, sc2tog the next 2 sts* repeat from * to * 4 more times, slip st into the first st – 12 sc
Rnd 29: Ch 1, sc2tog the first 2 sts, *sc2tog the next 2 sts,* repeat from * to * 4 more times, slip st into the first st – 6 sc
Fasten off leaving a LONG (around 15″) tail and use that to close the hole on the top and then go through the center of said hole and direct the needle out the bottom (in the middle of the magic circle). Go around the outside of the pumpkin (pull this tight) and go back down through the center of the top, navigating the needle through the middle of the pumpkin and out the bottom. I did this 5 times, you can do this as many times as you want to get the puffy pumpkin sections. Weave in your end and glue a stick to the top for your stem.
– Wreath –
The wreath body was wrapped in yarn many times. You can also create a sc piece of fabric to wrap around the body of the wreath as I did in my Halloween Wreath.
– Assembly –
Add your leaves and pumpkins in any way you’d like around your wreath. I grouped 3’s of the leaves and pumpkins together because I liked the symmetry but you can do it as you’d like.